Wednesday, February 26, 2014

The Ranch Kitchen's Pico De Galo

 Pico de Galo


I miss summer.  I miss my flowers, my garden and most especially our homegrown tomatoes.  I am starting to be sick of winter and all that comes with it. EVERY mosquito in my yard should be dead by now.  And we are ready to camp, wear short sleeved shirts and grill outside again! Winter needs to go away quietly, but for some reason this year it's wetter, colder, and more miserable than we ever remember!

I don't think it's because I'm getting old.  I do however think it's because like so many of us this year our winter in the south, north, east and west has been the most brutal we can imagine.  My heating bill attest to it and we've burned more fires in our fireplace than in the past!  My husband said the other night he had built his last fire in the fireplace....Kyle and I think differently!

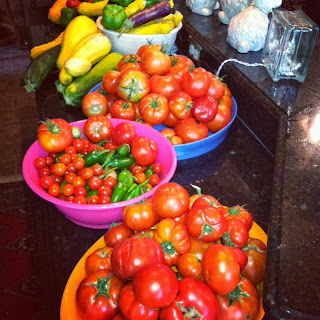
I had a few minutes to blog tonight and found a post of my summer tomatoes where I had posted the pictures above and below with the intent of posting the recipe some day soon.  Oh, how it made me ready for summer and this Pico de Galo!  Honestly though, this tomato side dish can be made anytime of year.  In Texas it's made year round in Mexican restaurants to go on the side of fajitas (beef skirt steak with bell peppers and onions served steaming hot on hot flour tortillas) or as a type of chunky salsa to dip your chips in (fried corn tortilla chips). 

The recipe pretty much follows what I have included below, but you can make variations by adding guacamole, sweet banana or bell peppers.  We love lots of lemon or lime juice in ours and I especially love using my Persian limes from my pot off my back porch.  And that makes me realize that I didn't think about how much I missed my fresh limes! 

Pico de Galo will keep in the refrigerator for up to 3 days and I have been known to add more tomatoes to it to keep it going bringing it out at dinner each night.  This dish isn't just for Mexican food and is great with just about anything be it summer, winter, spring or fall.


The Ranch Kitchen's Pico de Galo


8 tomatoes, chopped in 1/2 inch cubes
1 sweet white onion or red onion, chopped fine
1 bell pepper, seeded and chopped fine (optional)
1 sweet banana pepper, chopped fine
1 bunch cilantro, chopped fine
1 jalapeno pepper, seeded and chopped fine (seeding takes our some of the heat)
1 lime or lemon, juiced
1 teaspoon garlic salt
1 teaspoon pepper

Cut up tomatoes, onions, bell and sweet peppers, cilantro and jalapeno pepper.  You use the food processor for the peppers on the pulse button to get my vegetables to the right consistency.  I don't suggest pulsing the tomatoes in the food processor as they may get too mushy.  I like my tomatoes firm for my Pico.  Add all seasoning and taste.  If you need more lemon or lime juice, garlic salt or pepper, just add it to your own liking.


Looking at this picture from last summer really makes me wish for
summer and our  garden tomatoes!


Monday, February 24, 2014

Brown Sugar Pound Cake


I remember the first real cake I ever baked.  My mom let me do it all by myself and I added a cup of salt instead of a cup of sugar.  It rose and looked gorgeous...but my little brother Brent's face said it all!  I've never made that mistake again and always think back to that each time I get out a cup of sugar! 

This cake I found on The Lady Behind the Curtain's blog and it has more sugar in it than any cake I've ever made.  Having made this cake last year at Thanksgiving for a seasonal celebration that is all about excess... I was thankful it only comes once a year!  

So, I didn't count the calories in this and especially after I poured caramel sauce over the top of it!  My mixer almost started to smoke from overload of pecans, Bit of Brick Toffee Bits candy and the 3 cups of white and cups of white and brown sugar (not joking), but it sure was worth it.  The crust is my favorite part and is to die for!  The sugar crystallizes on the outside and makes the cake get this beautiful crusted glow to it. I'm thinking maybe Mother's Day I'll bake this wonderful cake again!

I've followed this blog The Lady Behind the Curtain for a few years and her recipes are wonderful!  Her Brown Sugar Pound Cake is no exception and seems to be a favorite on her Pinterest site. Here's the link @


The Lady Behind the Curtain's
Brown Sugar Pound Cake

Ingredients

  • 1-1/2 cups butter, softened
  • 2 cups light brown sugar, packed
  • 1 cup granulated sugar
  • 5 large eggs
  • 3 cups all-purpose flour
  • 1 teaspoon baking powder
  • 1/2 teaspoon salt
  • 1 cup whole milk
  • 1 – 8 ounce bag of toffee bits
  • 1 cup pecans, chopped
  • 1 recipe caramel drizzle - recipe on her site
Instructions

Preheat oven to 325 degrees.  Spray a 12 cup Bundt pan with nonstick baking spray with flour. Set aside.

Place softened butter along with light brown and white granulated sugar in a mixing bowl. Begin to beat on a low speed.  Continue beating and add eggs, one at time.  Mix flour, baking powder and salt in a side bowl and set aside. Begin adding 1/2 cup flour with alternate 1/4 cup of milk to the sugar and egg mixture as you continue to mix with the blender.  End with flour.  Add 1 - 8 ounce bag of Bit of Brick Toffee Bits to mixture and blend. Then add pecans a little at a time and continue to blend. 
Cook on  325 for 75 to 85 minutes until the cake can take a toothpick poked thru the center of the cake and it comes out clean, without any cake sticking to it.  Allow it to cool completely and invert on to a cake dish with a deep side to it.  Spoon over store bought caramel sauce of make you own!  This is why you need to deep sided dish!
The Lady Behind the Curtain has a link on her site where she made homemade caramel sauce and it looks wonderful http://www.ladybehindthecurtain.com/easy-caramel-drizzle-sauce/.  I took the easy way out by purchasing the caramel sauce at the store.  I should have bought two containers instead of the one of the caramel sauce as it didn't seem to go far enough. 
Enjoy and hope you enjoy this as much as we did! 

    Sunday, February 16, 2014

    Homemade Biscuit Doughnuts


     Homemade Biscuit Doughnuts

    One of the very first breakfast I made for my family growing up were these homemade doughnuts from the cheapest of biscuits from the grocery store. With two younger brothers always eager to eat up anything I made, these were certainly always a huge hit. I remember taking a homemaking class at my junior high and learning how to make these along with about 30 other giddy girls.

    At our house, our weekend breakfast now consist of large breakfast on Saturday or one bought from the local Daylight Doughnut shop.  I love our local shop and their smiling faces each time we go.  The little oriental ladies always give Audrey a free bag of doughnut holes to her delight!  My youngest daughter thinks her dad should buy doughnuts and kolaches (Kielbasa sausages wrapped in baked dough) for breakfast at least once each weekend! However, for this mornings breakfast I told her she needed to try my homemade biscuit doughnuts. 

    I don't think I've actually made these doughnuts since camping a few years ago when all our girls were home, so she didn't really remember them.  I hate to think it's that third child syndrome kicking in....you know where mom and dad are getting old and tired and we did more with the younger two?

    Audrey and I really enjoyed making these doughnuts and were a little 'sugared' up afterwards and her maroon t-shirt she wore to bed is now sprinkled heavily with powdered sugar!  Fun memories for sure, as Audrey helped cut out the dough, plop them gently into the hot oil and then roll them in the powdered sugar.  As always I cooked way too many and she tried to weasel out at the end from helping, but we finished the batch and we'll have doughnuts for the next few days for breakfast now!
    As I mentioned, I used the store bought variety of the cheaper brand of biscuits that usually come in a four pack bound together.  These are not like the flaky more expensive store biscuit brand.  You really want this cheaper biscuit variety as it fries and stays together better.  Its OK to buy cheap biscuits...promise!  We try to always have a lot of these biscuits on hand as we also fry them without the holes cut out of them (not dipped in powdered sugar) along with fried fish; dipping the biscuits in squirt butter and honey! Its a crowd favorite!

    I used our new Presto fryer to make these homemade doughnuts that my husband and I bought ourselves for Christmas this year.  They run for around $65.00, have two basket for ease in frying, and are one our favorite appliances now for frying fish when it's just our family.  Our bigger Cajun fryers work well for crowds in excess of 20, but this little gem is wonderful for our family and especially for this homemade doughnuts we made this morning. 

    I heated the oil to the highest heat level at 375 degrees.  You start by opening and dividing out your biscuits.  We pulled them apart slightly (making each biscuit a little more round and flat) and once they were separated then used the top of 1 liter soft drink bottle to cut out the circular holes in each biscuit.  Once you place the bottle top down over each biscuit, gently push down and twist the top to cut through the dough. After all biscuits are cut into doughnut shapes you can begin to cook them in batches once your oil is bubbling. 
    Place biscuits in hot oil and allow them to brown to a golden brown color on each side.  Gently turn over with a fork or tongs being careful not to hit hot oil on yourself. I had a bit of difficulty with the turning the doughnut holes and simply pushed them toward the side of the cooker pushing in one side (taking the puff out) to make them turn or flip better.
    Take out biscuits/doughnuts once both sides are browned and drain on paper towels.  Immediately place in a large bowl with 2 cups of powdered sugar.  Spoon powdered sugar over each biscuit and you have doughnuts! We ditched the spoon and started using our hands!  Eat and enjoy! 
    ***Store in container and eat leftovers in days to come.  These usually keep well for up to two days.
    Homemade Biscuit Doughnuts
    1 - 2 cans biscuit dough, separated and cut into doughnut shapes
    4 cups Canola Oil or any frying oil
    2 cups powdered sugar
    Separate doughnuts, enlarge slightly pulling dough apart into wider circles and cut holes into each using a bottle top.  Heat oil to 375 degrees and cook biscuits (now doughnuts) in batches, turning to brown on both sides.  Remove from oil and drain on paper towels.  Cover with powdered sugar in a large bowl and enjoy! 
    Alise and Audrey @ The Ranch Kitchen!


    Love, love my little Presto Fryer!


    Audrey helping out! 

    Saturday, February 15, 2014

    Roasted Mixed Vegetables with Parmessan Cheese


    Looking for a fast vegetable side dish that looks impressive with little effort? Then this recipe is certainly for you. No one ever said you had to cut and peel the vegetables yourself!

    Back around the holidays I had a huge bag of left over mixed vegetables.  You know the one that has your already cut up cauliflower and broccoli?  Right beside it in the fridge I had an even larger bag of carrots that I had been dragging out of the refrigerator each night to serve along side the broccoli and cauliflower as a side dish with Ranch Dressing.  As a last ditch effort to use them up, I got a little creative and you might even say down right lazy.  However, the end result was a winner and I've continued to cook these vegetable this way and even an occasional frozen one the same way! 


    Roasted Mixed Vegetable with Parmesan Cheese

    1 mixed bag of broccoli and cauliflower, uncooked
    1 bag, 2 cups approximately of carrots, uncooked
    1/4 cup olive oil (Canola oil, vegetable oil or any oil will work just fine)
    salt and pepper to taste
    Parmesan Cheese to sprinkle on the cooked vegetables at the end of cooking

    Gently wash vegetables and drain...or don't.  I didn't and we lived to tell the tale. 

    Place the vegetables on a layer of foil that is large enough that you can wrap another piece of foil on in order to create a packet to cook in.  Drizzle oil over the vegetables and gently mix together on top of the foil. Be careful not to break the foil lining. 

    Season with salt and pepper or your favorite seasoning. As you know I love Tony Chachere's and the other night I made this with frozen broccoli spears and used heir Herbs N' Spice for this recipe. 

    Add second piece of foil and curl sides up making a packet and tight seal.  Place on a baking sheet and bake at 375 - 400 degrees for thirty minutes. 

    After you take the vegetables out of the oven, gently cut a slit in the top of the foil being careful not to burn yourself.  Sprinkle with Parmesan Cheese or whatever cheese you like! 

    Serve and enjoy! 

    ***Our house guest for the spring especially loved this with the frozen broccoli spear and Tony Chachere's Herbs N' Spice the other night!  And I didn't even use the oil.  The water off the ice from the frozen broccoli spears helped keep the mixture moist.

    Hope you'll try it.  Never throw out those vegetables again! 

    Alise @ The Ranch Kitchen!
    

    Monday, February 10, 2014

    The Ranch Kitchen's Taco Loco Soup

     
    The Ranch Kitchen's Taco Loco Soup
     
     
    Texas this winter has been bitterly cold.  Yes, down here, we do winter...just not this cold of a winter!  Temperatures have been in the teens and twenties and if we had any mosquitoes, I hope they are long gone by now!  Our daughter is hoping for a long overdue snow day!  I know our friends up in the northern US are beyond sick of snow days and are ready for spring!
     
    Tonight I walked in to an under the weather husband. My workaholic man never comes in at 3:30 p.m., builds a fire and sits in his recliner before eight at night, so I knew he felt rough.  I also now have the delight of one extra mouth to feed and my older two girls say I get to experience what it's like to have a son in the house.  My relaxation at night strangely is cooking...so having one more around to eat what I dream up is going to be a treat!   
     
    This winter and spring we are sharing our house with dear Herefords friends son Kyle as he student teaches agricultural education at our high school.  When his parents asked us to find him a place to live, we knew immediately that he had to stay with us.  Our youngest daughter is pretty excited to have the company and I think the hubby is glad to have an extra hand on the ranch and on the trot lines this spring.  Kyle says he thinks he'll eat well and I feel certain I won't have many left overs! 
     
    So on this frigidly cold night I cooked my Taco Loco Soup.  This soup however is not your standard soup and is my TexMex version of Taco Soup with black beans.  Taco soup has been a favorite at our house for many years.  It's a simple can of this, and can of that soup with some taco seasoning mix, ranch powdered dressing mix and of course a little Tony Chachere's.  Except this time I used Tony Chachere's Spice N' Herbs Seasoning which isn't as spicy as my normal Creole Seasoning. I thought it would go well with the ranch dressing powdered mix and it was a great addition.
     
    My oldest daughter now makes Taco Soup on a normal basis and says her roommate loves it as much as she does. 
     
    Kyle enjoyed the my Taco Loco Soup tonight and went back for seconds.  Even our youngest daughter who tends to be a picky little eater cleaned her bowl and had room for dessert!  Of course her motto is that there is always room for dessert! 
     
    So if you are cold, tired, or just in a hurry for dinner....make my Taco Loco Soup!  You won't have many left overs and dinner can be ready in less than an hour easily!
     
     
    The Ranch Kitchen's Taco Loco Soup
     
     
    2 lbs. ground pork or ground beef, browned and all grease drained (I used ground pork)
    
    1 large onion, chopped
    1 can Hunts Stewed Tomatoes with Garlic
    1 can Hunts Stewed Tomatoes
    1 can Rotel Tomatoes with Cilantro and Lime
    1 can Ranch Style Black Beans, drained
    1 can Kidney Beans, drained
    2 cans Whole Kernel Corn, drained
    1 package McCormick Taco Seasoning
    1 package Ranch Dressing Mix - powdered NOT prepared salad dressing
    1 tsp. Tony Chachere's Spice N' Herbs Seasoning
     
    Brown meat and onions in large stew pot.  When slightly browned, drain grease off using a spoon.  I turn off the fire here, prop my pot carefully on a oven mitt and allow the grease to drain off to one side of the pot.  Gently spoon meat to one side of the pot before you drain off grease with a spoon, one tablespoon at a time into a heat proof boil. 
     
    Add to the meat mixture all vegetable cans as describe above, plus the taco seasoning, Ranch Dressing powdered mix and Tony Chachere's Spice N' Herb Seasoning.  Add four cans of water using the Rotel tomato can...that should realistically be about 5 cups of water total. 
     
    Bring the mixture to a boil on a medium high heat, then bring down to a low boil (low fire or electric stove top heat). Continue to cook on a low boil for twenty minutes, stirring occasionally making sure that your fire is not too high and you scorch your soup.  Always stir from the bottom of the pan and if you do scorch your soup, never scrap the bottom of the pot as the burnt flavor will ruin your soup. 
     
    Spoon into large bowls, sprinkle with cheddar cheese and a spoon of sour cream and enjoy!  We ate my Mexican Cornbread  from my link  to my Jumbo Mexican Cornbread (I'd cut this recipe down to 1/4th!), left over fried biscuits from our catfish from the night before and Kyle crumbled saltine crackers over the top of his.
     
    We sure are going to enjoy having him be a part of our family for a few months!  I hope he enjoy us and my cooking! 
     
    Alise @ The Ranch Kitchen


    Tuesday, February 4, 2014

    The Ranch Kitchen's Green Chili and Cheese Hash Brown Casserole


    Green Chili and Cheese Hash Brown Casserole
     
     
    Instant hash browns are now one of my new favorite food to stock in my pantry!  No peeling potatoes or thawing them out from the freezer.  Just pour, add hot water, allow potatoes to moisten and cook on your skillet or add to your casserole. Potatoes just got even easier!
     
    New Years Eve we had the pleasure of having my middle daughter's sweet college friends at our home and ranch.  We spent the better part of the two days while they were in eating and having a great visit!  I realize all to well that we need to cherish these times, because before long our house won't be the destination they chose.  We felt safe having them at our house and not on the roads/  We especially enjoyed watching our favorite team the Texas Aggies pull out a last minute win in their bowl game against Duke!  It was a nail bitter for sure!
     
    For that nights meal, to go along with the brisket we had smoked on our pit, I served these potatoes.  We all really enjoyed them and especially the kids.  It made enough that I served them again reheated in my oven with our annual New Years day lunch of pork ribs, black-eyed peas, my Granny's wilted cabbage, black-eyed pea relish and cornbread. Check out my recipe tab at the top of this page for all these recipes except for the black-eyed peas that will be posted soon.
     
     
    Green Chili and Cheese Hash Brown Casserole
     
    8  - 10 cups of dehydrated hash browns prepared according to package directions
    water for hash browns (see hash brown directions)
     
    For mixture:
    1 - 4 ounce, large can of diced green chili's
    1 can Campbell's Cream of Chicken Soup
    1 can Campbell's Cream of Mushroom Soup
    1 - 16 ounce can of Pet Evaporated Milk
    1 cup water
    2 cups cheddar cheese ( I used the cheddar cheese crumbles in the package and shredded would work just as well)
    1 stick margarine
    2 teaspoons Tony Chachere's Creole Seasoning
    1 tablespoon of garlic salt
     
    ***I did not add chopped green or white/yellow onions to this, but it would be a great addition
     
    Prepare hash brown according to package directions.  Make sure you drain well.  In a large bowl, place the hash browns and add both soups, evaporated milk, 1 cup water, cheese and seasonings.  Mix well as you add each ingredient.  Spoon hash brown mixture into a large 9 x 13 baking dish.  Place 1 tablespoon squares of margarine across the entire top of the hash brown casserole.  Sprinkle with additional Tony Chachere's for seasoning and color before placing in the oven.
     
    Bake uncovered at 375 degrees for 1 hour or until mixture is bubbling throughout and cheese is melted. 
     
    This is an easy, great dish to take to potlucks, work, or just serve at home.  I made this for a huge crowd and don't see why if you didn't want to cook this entire portion in one night you couldn't place half of it in a freezer container and cook at a later date. 
     
    Let me know what you think!
     
    Alise @ The Ranch Kitchen